PokerTracker 4 Premium Add-Ons (For Developers)
Overview
Premium Add-Ons are available in PokerTracker 4.10 and later. They let you create customizations such as HUD Profiles, Statistics and Reports that are protected to prevent users from modifying or sharing your Add-On with others. A Premium Add-On is installed automatically to the user’s registered PokerTracker 4 client. Any changes you save are published immediately, and each user receives them the next time they start PokerTracker 4.
Only pre-approved Premium Add-On Developers can access the tools needed to publish and protect a Premium Add-On. PokerTracker management reserves the right to choose which developers are accepted into or removed from the Premium Add-On Developer Program.
How it works
- Apply for permission to become a Premium Add-On Developer.
- Create the custom content you want to sell or share with the PokerTracker 4 community.
- Upload the content to the developer dashboard as a premium add-on.
- Set the default permissions every customer of the add-on receives, and define the stake group tiers you want to be able to assign.
- Bundle several add-ons into a package if you want to distribute them as one product.
- Give customers access, either one at a time or by assigning a customer group.
- Assign a stake group and override permissions for the customers who need something different.
- When the customer restarts PokerTracker 4, the add-on is downloaded and installed automatically with the permissions you configured.
Content available for protection
The Addon Type dropdown offers the following content types:
- HUD
- Reports
- Stats
- Replayer Themes
Product currently offers PokerTracker 4 only.
How to apply
To apply to become a PokerTracker Premium Add-On Developer, email merchants@pokertracker.com with the subject “PokerTracker 4 Premium Add-On Developer Application”. In your email, provide the following information:
- Your registered PokerTracker.com user account.
- Whether you are applying as an individual or a business, with a mailing address and phone number. Include the business name if you are applying as a business.
- The URL to your website where you will be providing PokerTracker Premium Add-Ons.
- A brief description of yourself or the business.
- A brief description of the type of premium add-ons you will be providing.
PokerTracker typically replies within two business days.
Key concepts
Four objects make up the developer dashboard — add-ons, packages, customers and customer groups — and permissions and stake groups are the settings you apply to them. Every task on this page is an operation on one of these.
Permissions
Permissions are on/off feature toggles that an add-on’s type exposes — for example, whether a customer may add or remove stats in one of your reports. Each type has its own list, so the checkboxes you see depend on the Addon Type and Product you chose. HUD exposes 15 permissions, Reports exposes 6 and Replayer Themes exposes 1.
Until a type and product are selected, the form reads “Select an addon type and product to load available permissions.” rather than showing an empty grid.
Stake groups
A stake group is a maximum, inclusive stake limit. Each one holds a single value per game type:
| Field | Meaning | Example entry |
|---|---|---|
| NL & PL Stakes | Highest no-limit or pot-limit stake | 0.25 |
| Limit Stakes | Highest fixed-limit stake | 0.50 |
| Max Tourn./SNG Buyin | Highest tournament or SNG buy-in | 22.00 |
Define as many stake groups as you need and treat them as tiers. Each customer is assigned one tier, or none at all.
Tiers are identified by their values rather than by a name you choose. The example above appears in customer dropdowns as 0.25 NL, 0.50 FL & 22.00 buyin. Values are normalized to two decimal places when saved, so 5 is stored as 5.00.
Packages
A package bundles several add-ons together. When a customer is added to a package, they automatically receive access to every add-on in it, which lets you distribute a collection of add-ons as a single product.
A package defines its own permissions and stake groups, one set for each add-on type it contains. Those settings replace the ones on the member add-ons, which contribute nothing but their content — so a customer whose access comes from the package follows the package’s restrictions, not the add-on’s. See Packages.
Customers and customer groups
A customer is one PokerTracker 4 license, identified by the email address and registration code it was registered with. A customer group is a named collection of customers: assign the group to an add-on or a package and every member gets access at once.
A customer holds one access per add-on, and that access records where it came from — you, a package or a group.
Creating a premium add-on
The developer dashboard is only available to accounts approved for the PokerTracker Premium Add-On program. See How to apply.
- Sign in to the PokerTracker developer dashboard with your PokerTracker account.
- In the left sidebar, select Premium Addons > Manage Addons.
- Click NEW ADDON.
- Choose the Addon Type and Product, then enter an Addon Name.
- Enter a Trial Length (Days) if new customers should start on a time-limited trial.
- Under Upload Your Files, select the add-on file.
- Under Permissions, tick the features every customer of this add-on gets by default.
- Under Stake Groups, click ADD STAKE GROUP and enter the tiers you want to be able to assign later.
- Click CREATE ADDON.
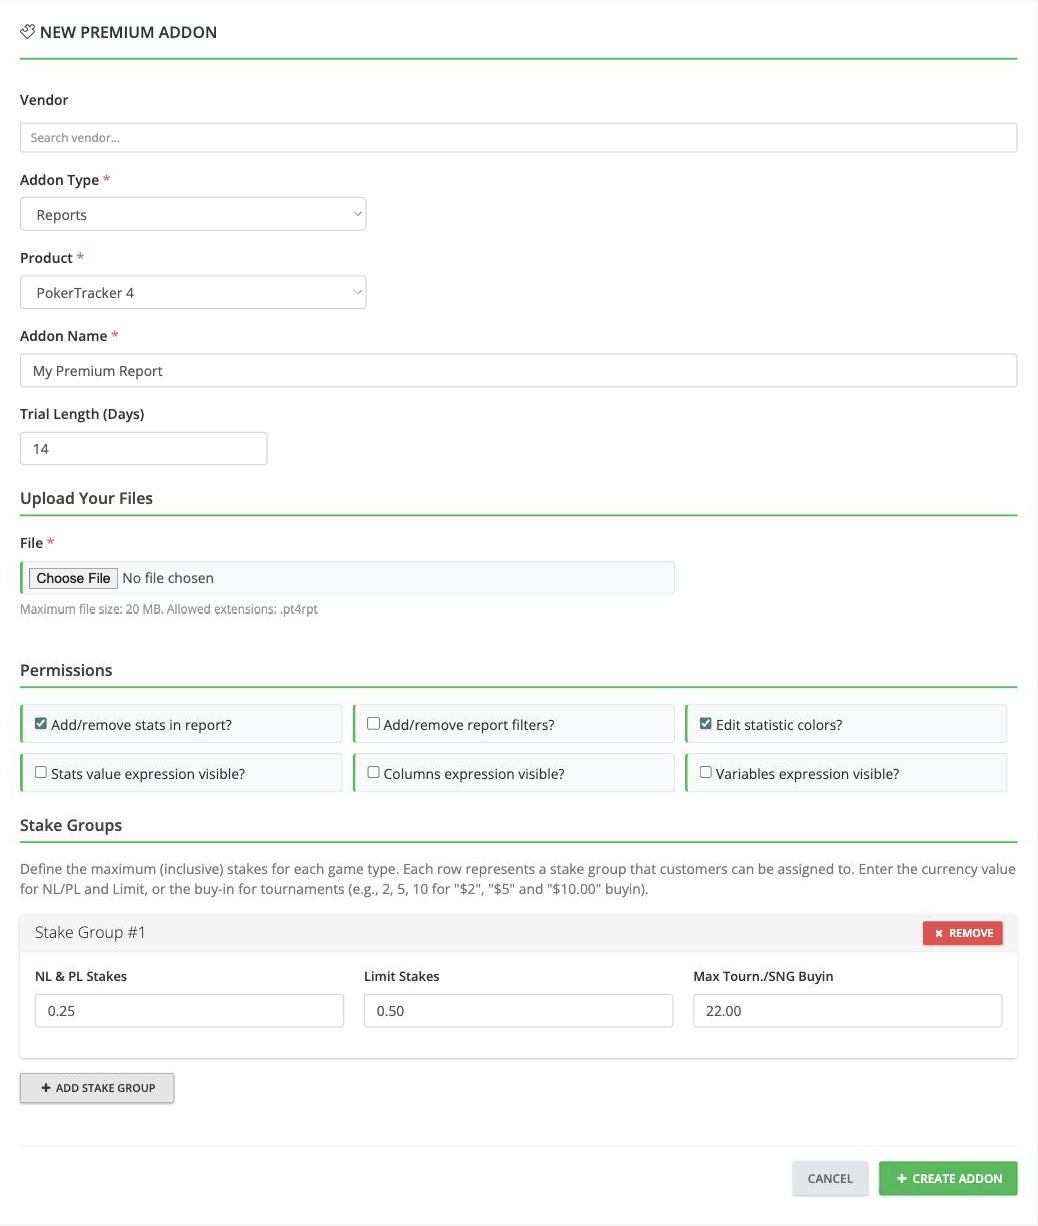
The upload field states the size limit and the extensions your chosen type accepts:
| Addon type | Maximum size | Extensions |
|---|---|---|
| HUD | 20 MB | .cfg, .pt4hud |
| Reports | 20 MB | .pt4rpt |
| Replayer Themes | 25 MB | .zip, .pt4theme |
Some types also ask for images under Addon Images — a Screenshot and a Thumbnail, plus a HUD Logo for HUD add-ons. Supply them when the form shows them, because saving without them fails with “Please upload required files: Screenshot, Thumbnail”.
Your premium add-on has now been uploaded to the store and is ready to be shared. The next step is to give your customers access.
Changing an existing add-on
- Sign in to the PokerTracker developer dashboard and select Premium Addons > Manage Addons.
- Locate the add-on you want to modify.
- Click EDIT on its row.
- Make your changes.
- Click SAVE CHANGES.
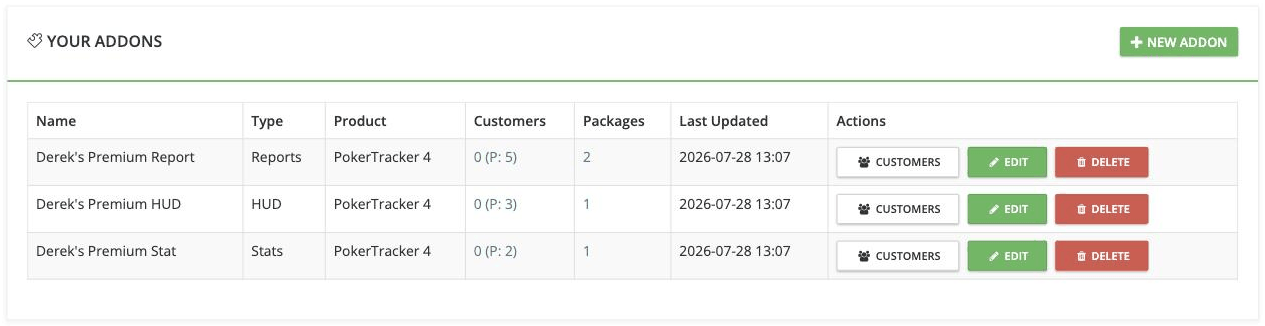
Every row offers the same three buttons: CUSTOMERS opens the add-on’s customer list, EDIT opens the add-on for editing and DELETE removes it. The Customers column uses a 0 (P: 5) notation, where the first number counts the customers you added to the add-on directly and the number in parentheses counts those who reach it through a package.
Any saved changes are published immediately, and every customer you have assigned to the add-on receives them the next time they start PokerTracker 4.
If a customer has permission to alter or customize your add-on, any alterations they made are deleted when you update the add-on. Plan accordingly so that the loss of these changes does not affect your customers.
Setting add-on defaults
Permissions and stake groups are both set on the add-on’s edit page, reached from Manage Addons > EDIT, but the two work differently. Permissions are true defaults: every customer of the add-on follows them unless you override a permission for that customer. Stake groups are a menu of tiers you define here so you can assign them later — defining one does not restrict anyone until you select it for a customer or a group.
Default permissions
Tick the permissions every customer should receive, then click SAVE CHANGES.
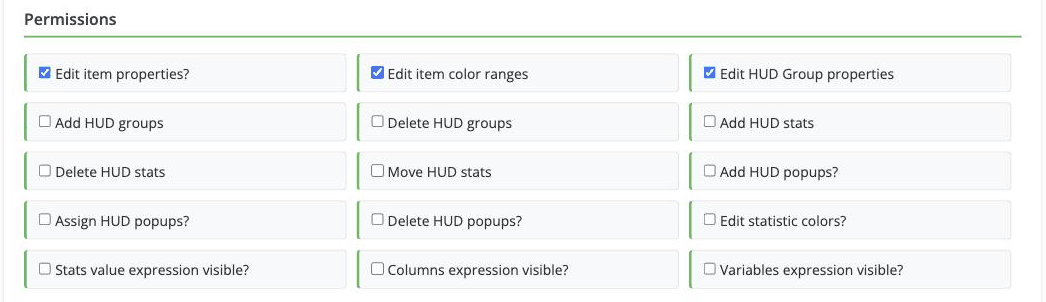
Only the differences from these defaults are stored against a customer. So when you change a default later, every customer picks up the change for the permissions they never overrode, while their own overrides stay untouched. To give one customer something different, see Overriding permissions.
Defining stake groups
- Scroll to Stake Groups on the add-on’s edit page.
- Click ADD STAKE GROUP to add a numbered row.
- Enter the values for NL & PL Stakes, Limit Stakes and Max Tourn./SNG Buyin.
- Repeat for each tier you want to offer.
- Click SAVE CHANGES.
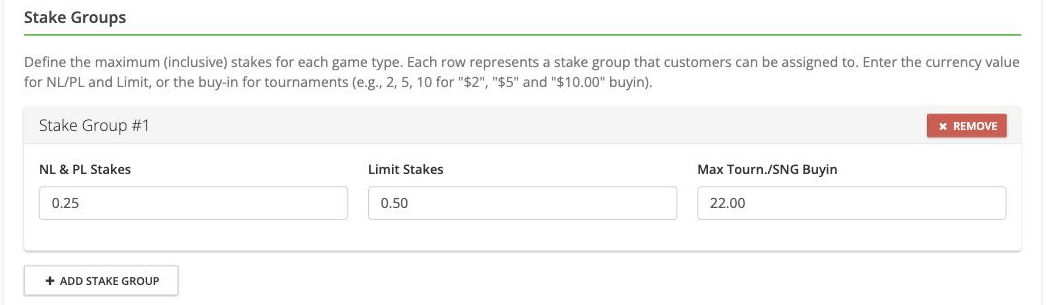
Leave a field blank to keep that game type unrestricted by the tier. A row left completely blank is not saved. When no stake groups are defined, the section reads “No stake groups configured.”
Changing a stake group’s values
Edit the values in place, then click SAVE CHANGES. Every customer already assigned to that stake group follows the new values immediately — a customer is assigned to the stake group itself rather than to a copy of its numbers, so there is nothing to reassign.
Removing a stake group
Click REMOVE on the stake group’s row, then click SAVE CHANGES. There is no confirmation prompt, and the row is only dropped once you save — until then, CANCEL discards the removal along with any other unsaved edits.
Removing a stake group also clears it from every customer assigned to it. Those customers revert to -- No Stake Restrictions --, which lifts their stake limit entirely, so reassign them to another tier if that is not what you want.
Packages
Packages live under Premium Addons > Addon Packages, and NEW PACKAGE creates one. A package carries a Package Name and its own Trial Length (Days), exactly like an add-on.
Package restrictions
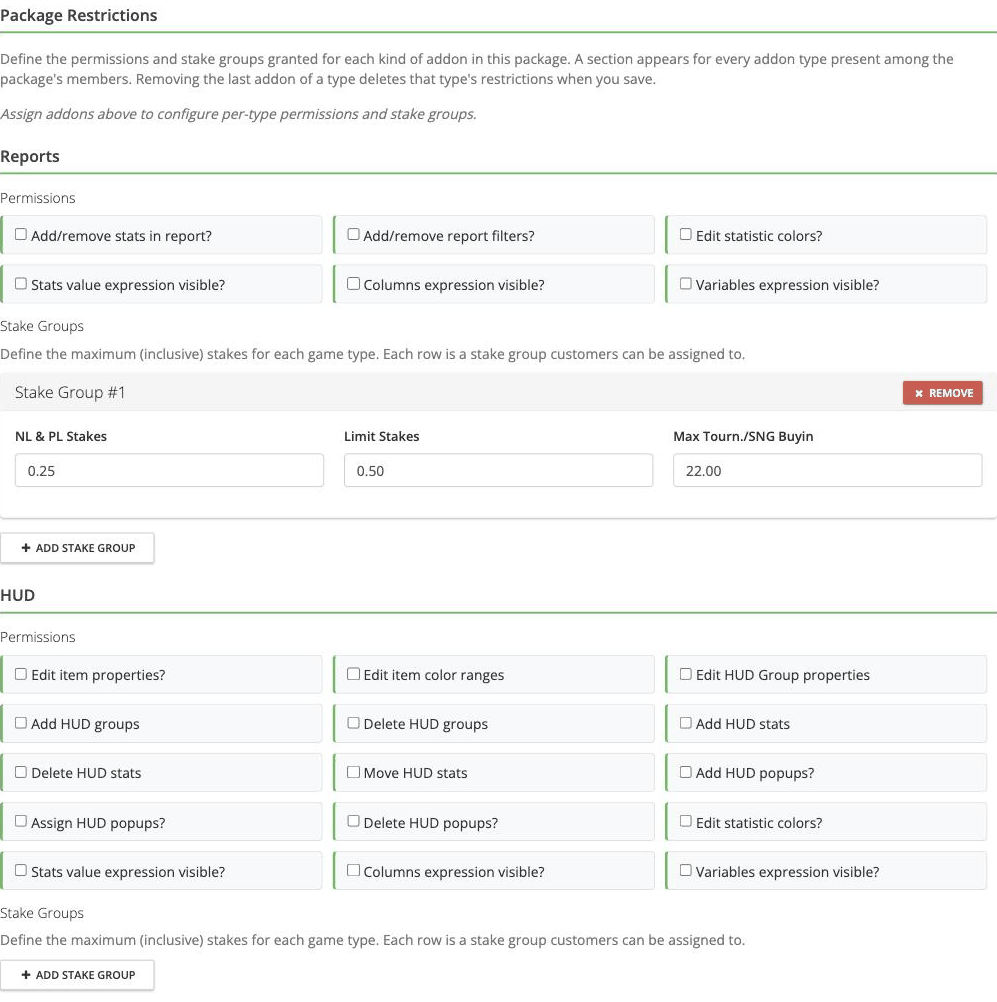
A package uses only its own permissions and stake groups. The settings on the member add-ons are ignored while a customer’s access comes from the package, so configure the restrictions on the package itself.
Package Restrictions shows one section for each add-on type in the package, each with its own Permissions grid and Stake Groups rows. A package holding a Reports add-on and a HUD add-on therefore has two sections to fill in, and each behaves exactly like the add-on defaults above.
Adding or removing member add-ons
- Open the package and scroll to Package Addons.
- Pick an add-on from the dropdown, then click ASSIGN.
- Click UNASSIGN on a row to take that add-on out of the package.
- Click SAVE CHANGES.
Removing the last add-on of a given type deletes that type’s restrictions when you save.
Managing customers
A customer reaches your add-on in one of three ways:
- You added them to the add-on directly.
- They belong to a customer group that is assigned to the add-on.
- They hold access to a package that contains the add-on.
To see the customers of one add-on, go to Manage Addons and click CUSTOMERS on the add-on’s row.
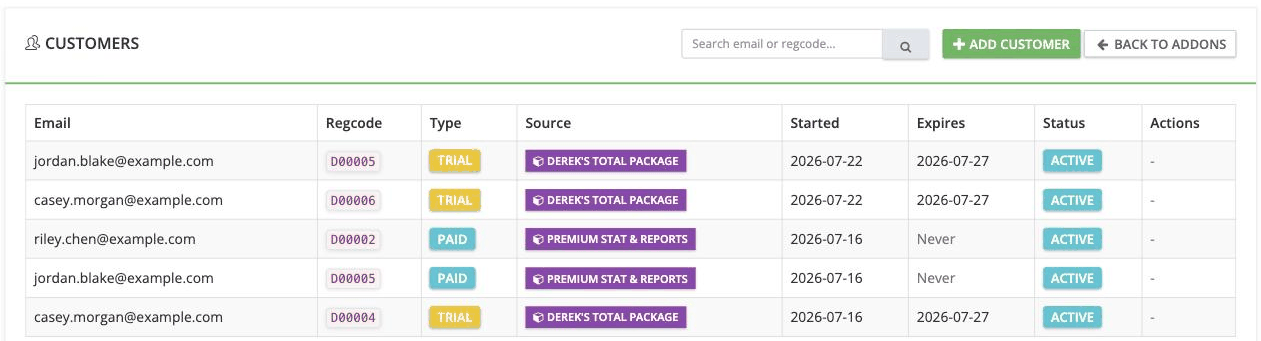
The Source column names where each access came from. Rows sourced from a package or a customer group show a badge there and a - in Actions, because their permissions and stake group are managed on the package or the group rather than on the individual customer. Rows you added to the add-on directly carry no badge and do expose per-row actions.
Above the table, the CUSTOMER GROUPS panel lists the groups assigned to this add-on. See Customer groups.
Adding a customer
- Click ADD CUSTOMER on the add-on’s customer list to grant access to that add-on, or go to Premium Addons > Customers > ADD CUSTOMER to create a customer without granting any access yet.
- Choose the Product and enter the customer’s Email.
- Enter the last six characters of the customer’s Registration Code.
- Tick any Customer Groups the customer should join.
- Click ADD CUSTOMER.
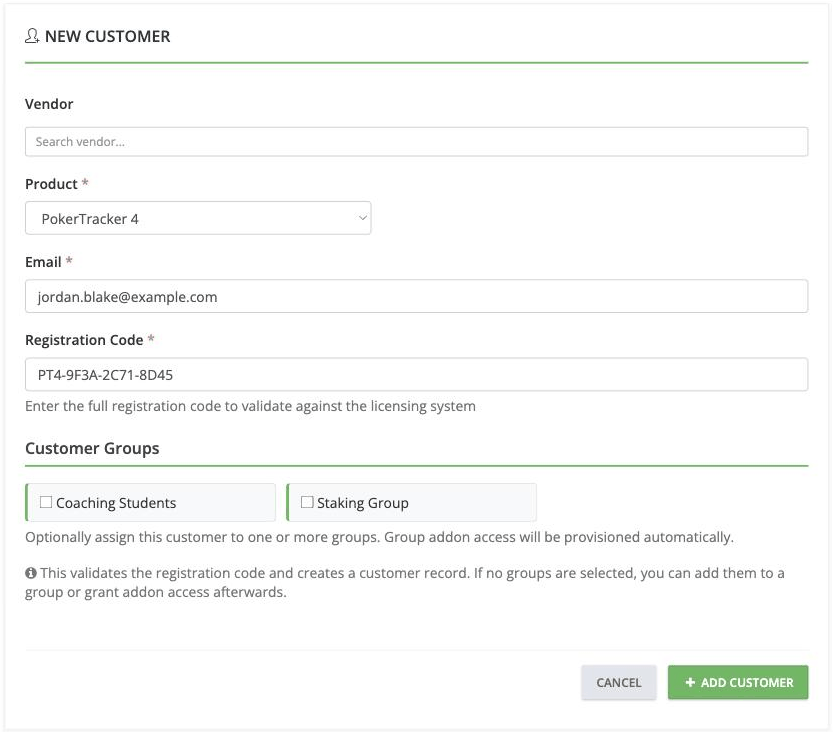
The email address and registration code must be the ones the customer registered PokerTracker 4 with. Both are in PokerTracker 4 under Help > About. The form needs only the last six characters of the registration code, not the whole code. If Help > About does not show these values, ask the customer to upgrade to the latest version of PokerTracker 4 before proceeding.
The code is validated against the licensing system as the customer is created. If the pair does not match a license, the form reports “No license found for the provided email and registration code.” and no customer is created.
Selecting groups on this form provisions the group’s add-on access automatically. If you select none, you can add the customer to a group or grant add-on access afterwards.
Editing a customer
Open the add-on’s or package’s customer list, locate the customer, then click the edit action on their row.
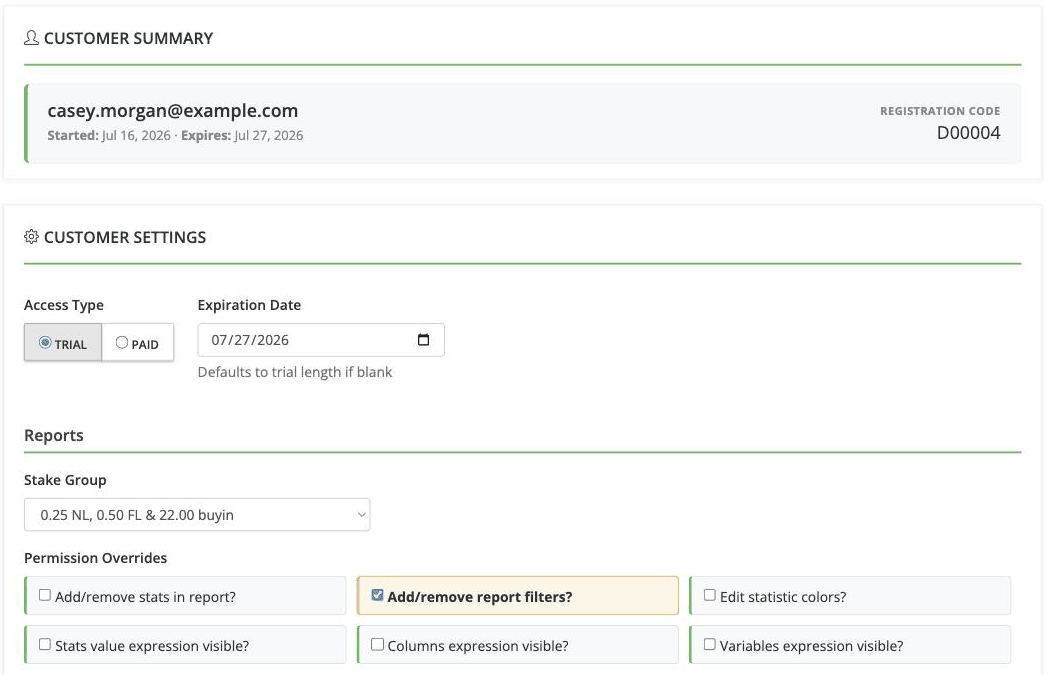
CUSTOMER SUMMARY shows the email address, the access dates and the registration code. CUSTOMER SETTINGS holds Access Type and Expiration Date. Below those, each add-on type contributes a Stake Group dropdown and a Permission Overrides grid. Click SAVE CHANGES when you are done; this returns you to the customer list you came from.
Overriding permissions
Under Permission Overrides, toggle the features you want to change for this customer, then click SAVE CHANGES. Highlighted permissions are the ones that differ from the add-on or package default — in the image above, Add/remove report filters? has been switched on for this customer alone.
An override applies to this customer alone and leaves every other customer of the add-on or package untouched. Only the permissions you actually change are stored, so the rest continue to follow the default and move with it.
Setting a stake group
Unlike permissions, a stake group is never applied for you. A new access starts on -- No Stake Restrictions -- with nothing selected, however many tiers the add-on or package defines, so a customer plays at any stake until you choose a tier for them.
Under Stake Group, select one of the tiers defined on the add-on or package, then click SAVE CHANGES. Select -- No Stake Restrictions -- to lift the restriction again. A package gives you one dropdown per add-on type, and a type with no stake groups defined reads “No stake groups assigned”. Re-opening the access later shows the tier you stored.
Finding a customer across all add-ons
Premium Addons > Customers opens the cross-add-on view. Search by email address or registration code, filter by product or narrow the list to customers with active access, then click FILTER. CLEAR resets the filters.
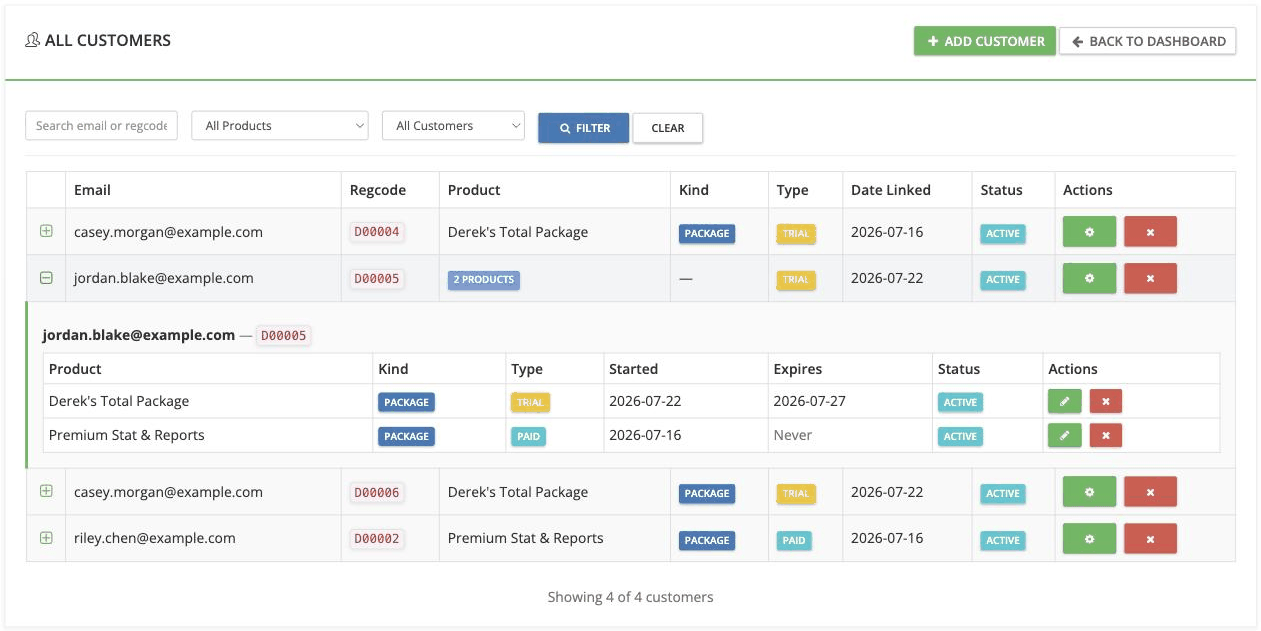
Click the + beside a row to reveal that customer’s individual accesses, one row per product. A Kind of — on the top-level row means the customer’s accesses are mixed across products rather than all of one kind, so expand the row to see what they hold. Paid access shows an Expires value of Never, while a trial shows a date.
Each level has its own actions. On a top-level row the green cog opens the customer’s detail page and the red X removes the customer altogether. On an expanded access row the green pencil edits that one access and the red X removes only that access.
The customer detail page gathers everything about one customer into four panels:
- CUSTOMER INFORMATION — the email address, registration code and add-on count. DELETE CUSTOMER removes the customer and all of their access.
- CUSTOMER GROUPS — the groups this customer belongs to, with ADD TO GROUP to join another.
- PRODUCT ACCESS — every access the customer holds.
- ADD TO ADDON — every add-on and package you offer, each with an ADD ACCESS button.
Customer groups
Customer groups let you organize customers into named collections. Assign a group to an add-on or a package to grant access to all of its members at once. Groups live under Premium Addons > Customer Groups, and NEW CUSTOMER GROUP creates one. A group carries a Group Name and an optional Description, and MANAGE MEMBERS adds and removes customers.
Assigning a group
Two routes reach the same result:
- On the add-on’s or package’s customer list, pick the group in the CUSTOMER GROUPS panel and click ASSIGN.
- On Customer Groups > EDIT, pick the target in the ASSIGNED ADDONS panel and click ASSIGN. This dropdown lists packages as well as individual add-ons.
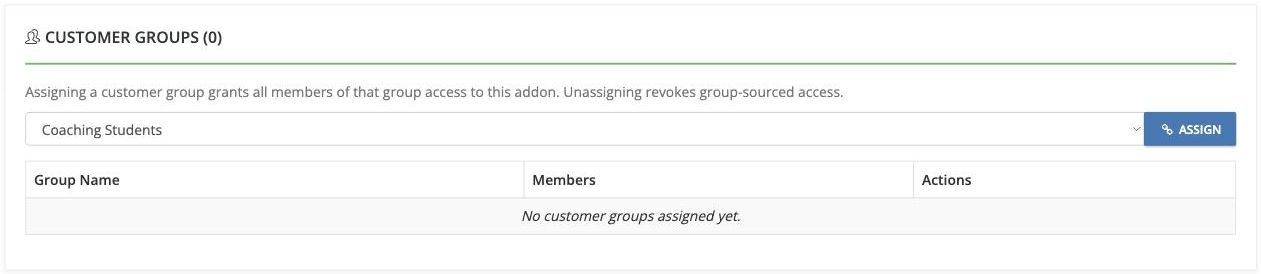
Members receive the group’s access immediately, and anyone you add to the group later receives it too.
Group permissions and stake groups
A group’s restrictions are configured per add-on or package, on the group’s Settings page rather than on the group itself. Editing a group under Customer Groups changes its name, description and membership only — it never pushes restrictions. Assigning a single add-on grants access straight away with no form to fill in, so open Settings afterwards if that group needs anything other than the add-on defaults.
Saving these settings re-applies them to every group-sourced active access for that add-on, both the members who already have access and anyone added to the group later. Clearing the settings puts those members back on the add-on defaults. Group settings are layered on those defaults rather than replacing them, so a permission the group never changed still follows the add-on default and moves when you change it.
Accesses you granted individually, accesses that came from a different group and accesses you have converted to individual access are all skipped and reported as such. Saving group settings therefore cannot overwrite anyone you deliberately set up by hand.
A member whose access came from a group has no individual permission or stake controls, because those settings belong to the group. To give one member something different, use Convert to Individual Access. This converts a single access, not the customer: they stay in the group, their current permissions and stake group are kept as the starting point and become editable, and later group changes no longer reach that access. It also survives a later UNASSIGN, which only revokes access that is still group-sourced. A member of a group assigned to three add-ons needs converting once per add-on.
Unassigning a group
Click UNASSIGN on the group’s row. Access that came from that group is revoked. Removing a single member from the group revokes that member’s group-sourced access the same way and leaves everyone else untouched.
Which setting wins
| Source | Applies to |
|---|---|
| Add-on or package defaults | Every customer of that add-on or package |
| Customer group settings | Group-sourced active accesses for that add-on, layered over the defaults |
| Individual customer settings | One access, layered over the defaults |
A customer holds one access per add-on, so exactly one of the last two rows governs it — never both. Convert to Individual Access is what moves an access from the second row to the third.
Both of the lower rows store only their differences from the defaults, so the top row is never bypassed: anything a group or a customer has not specifically changed still follows the add-on or package default, and moves whenever you change it.
A package uses its own permissions and stake groups, not those of the add-ons inside it, so configure restrictions on the package itself. Customers whose access came from a package are managed from that package’s own customer list: on an add-on’s customer list their Source column names the package and their Actions cell shows -.
Trials and access
Trial Length (Days) on an add-on or a package sets how long a new trial runs by default. Each customer’s access then carries an Access Type of TRIAL or PAID together with an Expiration Date.
Converting a trial customer to paid
Two controls convert a trial customer to a paid customer:
- On the customer’s detail page, reached from Premium Addons > Customers by clicking the green cog on their row, click SWITCH TO PAID on the access you want to convert.
- On the access edit page, set Access Type to PAID and click SAVE CHANGES.
Paid access shows Expires: Never unless you set an expiration date.
Setting an expiration date
Open the customer’s access for editing and enter a new Expiration Date. The field replaces the date outright rather than adding days to it, so to extend a trial by a week, enter a date one week later than the one already there. Leave the field blank to fall back to the add-on’s trial length, as its helper text states: “Defaults to trial length if blank”.
Removing access
Removing access stops a customer from using an add-on you previously granted them.
Two controls remove access, with different scope:
- Remove on a single access row removes that one access and leaves the customer’s other access intact. Your browser asks you to confirm.
- Remove All, the red X on a top-level row of the cross-add-on customer list, removes the customer record together with every access it holds.
Neither control removes access that came from a customer group. Take the customer out of the group, or unassign the group from the add-on.
Premium custom stats and custom columns
Any custom stats or custom columns you ship must have unique names that are not at risk of conflicting with third-party custom columns or custom stat names created by the user community or by other Premium Add-On Developers.
Add a prefix to the name of all custom columns and stats to lower the possibility of conflicting names. For example, if your Premium Add-On product name is LASVEGASHUD and the product contains custom stats and columns, the prefix for each custom stat or column name could be lvh_. This development standard has the side effect of making it easier to find all custom stats or columns associated with your Premium Add-On.
Frequently asked questions
Why is nothing listed under Permissions or Stake Groups?
Either no Addon Type and Product are selected yet, or the combination you selected offers no options of that kind. In both cases the form states which, rather than showing an empty grid.
Do I have to reassign customers after changing a stake group’s values?
No. Every customer assigned to that stake group follows its new values.
What does “No Stake Restrictions” mean?
No stake limit is applied for that add-on type, so the customer can use the add-on at any stake.
Why does a customer row have no EDIT or DELETE button?
Its access came from a package or a customer group, named in the Source column. Manage it on the package or the group, or open the customer from Premium Addons > Customers.
Why did adding a customer fail with “No license found”?
The email address and registration code did not match a license. Check both against PokerTracker 4 Help > About, and enter only the last six characters of the registration code.